Skip to content










แสงสว่างมักจะสว่างเกินไปหรือมืดเกินไป หลายคนต้องการการควบคุมที่ราบรื่น แต่ต้องเผชิญกับปัญหาไดม์เมอร์และไดรเวอร์ LED ที่เข้ากันไม่ได้.
TRIAC Dimmer เช่น BQ-TTDIM ควบคุมความสว่างโดยการตัดส่วนหนึ่งของรูปคลื่น AC แต่ละรอบ โดยใช้สารกึ่งตัวนำ TRIAC เพื่อสลับกระแสไฟฟ้าในแต่ละรอบของ AC ลดพลังงานที่ส่งไปยังหลอดไฟ และช่วยให้การหรี่แสงราบรื่นสำหรับหลอด LED ฮาโลเจน และหลอดไส้ที่เข้ากันได้.

ในโครงการปรับปรุงระบบแสงสว่างหลายโครงการ ฉันมักเห็นความสับสนเกี่ยวกับการหรี่แสงแบบ TRIAC และความเข้ากันได้ของ LED BQ-TTDIM ได้รับการออกแบบมาเพื่อทำให้กระบวนการนี้ง่ายขึ้น โดยการรวมอินเทอร์เฟซไดม์เมอร์ติดผนังแบบหมุนแบบดั้งเดิมเข้ากับความเข้ากันได้ของไดรเวอร์ LED สมัยใหม่ เพื่อให้เข้าใจว่ามันทำงานอย่างไร เราต้องดูว่าการหรี่แสงแบบ TRIAC ทำงานอย่างไร และทำไมมันยังคงครองระบบแสงสว่างหลายระบบในปัจจุบัน.
TRIAC Dimmer คืออะไร และทำไมจึงใช้ในระบบแสงสว่าง LED?
ระบบแสงสว่างหลายระบบต้องการความสว่างที่ปรับได้ สวิตช์แบบดั้งเดิมเพียงแค่เปิดหรือปิดไฟเท่านั้น ซึ่งสร้างความไม่สบายและสิ้นเปลืองพลังงาน.
TRIAC Dimmer ปรับความเข้มของแสงโดยการตัดส่วนหนึ่งของรูปคลื่น AC แต่ละรอบ โดยการหน่วงเวลาที่กระแสไฟฟ้าไหลในแต่ละรอบของ AC จะลดพลังงานที่ส่งไปยังหลอดไฟและเปลี่ยนความสว่างอย่างราบรื่น.
ทำความเข้าใจแนวคิดพื้นฐานของการหรี่แสงแบบตัดเฟสของ TRIAC
การหรี่แสงแบบ TRIAC ใช้วิธีการที่เรียกว่า การหรี่แสงแบบตัดเฟส. ไดม์เมอร์อยู่ระหว่างแหล่งจ่ายไฟ AC หลักและโหลดแสงสว่าง แทนที่จะลดแรงดันไฟฟ้าอย่างต่อเนื่อง มันจะตัดส่วนหนึ่งของรูปคลื่น AC.
ในแต่ละรอบของ AC:
- แรงดันไฟฟ้า AC เพิ่มขึ้นจากศูนย์.
- ไดม์เมอร์หน่วงเวลาในการเปิด TRIAC.
- เมื่อถูกกระตุ้น TRIAC จะยอมให้กระแสไฟฟ้าไหล.
- ส่วนที่เหลือของรูปคลื่นจะถูกส่งไปยังโหลด.
เมื่อไดม์เมอร์หน่วงจุดกระตุ้นมากขึ้น พลังงานที่ไปถึงหลอดไฟจะน้อยลง ความสว่างจะลดลง.
วิธีนี้ทำงานได้ดีกับโหลดแบบต้านทาน เช่น หลอดไส้. อย่างไรก็ตาม ระบบแสงสว่าง LED ต้องใช้ไดรเวอร์ในการแปลง AC เป็นกระแส DC ที่เสถียร.
ความแตกต่างระหว่างไดม์เมอร์แบบดั้งเดิมและไดม์เมอร์ที่เข้ากันได้กับ LED
ไดม์เมอร์แบบดั้งเดิม ถูกออกแบบมาสำหรับหลอดไส้ LED มีพฤติกรรมที่แตกต่างกันเพราะต้องพึ่งพาไดรเวอร์อิเล็กทรอนิกส์.
ความแตกต่างที่สำคัญ ได้แก่:
| คุณสมบัติ | ไดม์เมอร์แบบดั้งเดิม | TRIAC Dimmer ที่เข้ากันได้กับ LED |
|---|---|---|
| ประเภทโหลด | หลอดแบบต้านทาน | ไดรเวอร์ LED อิเล็กทรอนิกส์ |
| โหลดขั้นต่ำ | มักจะสูง | ความสามารถในการรับโหลดต่ำกว่า |
| ความเสี่ยงการกะพริบ | ต่ำ | อาจเกิดขึ้นได้หากเข้ากันไม่ได้ |
| ช่วงการหรี่แสง | กว้างสำหรับหลอดไส้ | ขึ้นอยู่กับการออกแบบของไดรเวอร์ |
ไดม์เมอร์ที่เข้ากันได้กับ LED ต้องควบคุมรูปคลื่นอย่างระมัดระวังเพื่อป้องกันการกะพริบหรือความไม่เสถียร.
ส่วนประกอบสำคัญภายในวงจร TRIAC Dimmer
TRIAC Dimmer ประกอบด้วยชิ้นส่วนอิเล็กทรอนิกส์หลายชิ้นที่ทำงานร่วมกัน.
ส่วนประกอบหลัก ได้แก่:
| ส่วนประกอบ | ฟังก์ชัน |
|---|---|
| ไตรแอก | สวิตช์สารกึ่งตัวนำที่ควบคุมกระแส AC |
| DIAC | กระตุ้น TRIAC เมื่อแรงดันไฟฟ้าถึงเกณฑ์ |
| เครือข่ายเวลา RC | กำหนดค่าหน่วงเฟส |
| โพเทนชิโอมิเตอร์ | ปรับระดับความสลัว |
| ตัวกรอง EMI | ลดสัญญาณรบกวนทางไฟฟ้า |
เครือข่ายจังหวะเวลาจะกำหนดว่า TRIAC จะจุดไฟในช่วงใดของรอบไฟฟ้ากระแสสลับแต่ละรอบ.
การใช้งานทั่วไปในระบบแสงสว่างที่อยู่อาศัยและเชิงพาณิชย์
ตัวหรี่ไฟแบบ TRIAC ยังคงพบได้ทั่วไปในสภาพแวดล้อมแสงสว่างหลายแห่ง.

การใช้งานทั่วไปได้แก่:
- ไฟเพดานห้องนั่งเล่น
- ไฟติดผนังตกแต่ง
- ร้านอาหารและคาเฟ่
- ทางเดินโรงแรม
- จัดแสดงสินค้าในร้านค้าปลีก
ในกรณีเหล่านี้ การหรี่ไฟช่วยปรับปรุงบรรยากาศและการควบคุมพลังงาน.
เหตุใดการหรี่ไฟแบบ TRIAC ยังคงได้รับความนิยมในโครงการปรับปรุงใหม่
แม้จะมีเทคโนโลยีการหรี่ไฟที่ใหม่กว่า เช่น 0-10V หรือ DALI การหรี่ไฟแบบ TRIAC ยังคงครองการติดตั้งในโครงการปรับปรุงใหม่.
เหตุผลได้แก่:
| ข้อได้เปรียบ | คำอธิบาย |
|---|---|
| สายไฟที่มีอยู่เดิม | ทำงานกับสายไฟ AC มาตรฐาน |
| ต้นทุนต่ำ | อิเล็กทรอนิกส์ที่เรียบง่าย |
| อินเทอร์เฟซที่คุ้นเคย | ตัวหรี่ไฟติดผนังแบบหมุน |
| ติดตั้งง่าย | ไม่ต้องใช้สายควบคุมเพิ่มเติม |
ด้วยความเรียบง่ายนี้ อุปกรณ์เช่น BQ-TTDIM จึงยังคงถูกใช้งานอย่างแพร่หลาย.
ภาพรวมของตัวหรี่ไฟ TRIAC รุ่น BQ-TTDIM
การเลือกตัวหรี่ไฟที่ผิดมักทำให้เกิดการกะพริบหรือความสว่างที่ไม่เสถียร ช่างติดตั้งหลายคนประสบปัญหาในการจับคู่ตัวหรี่ไฟกับไดรเวอร์ LED.
BQ-TTDIM เป็นตัวหรี่ไฟแบบหมุน ตัวหรี่ไฟแบบตัดเฟส TRIAC ออกแบบมาสำหรับไดรเวอร์ LED ที่หรี่ได้ หลอดไส้ และหลอดฮาโลเจน ทำงานที่ไฟ AC200-240V และรองรับโหลดสูงสุด 400W.

แนะนำรุ่นตัวหรี่ไฟ BQ-TTDIM
BQ-TTDIM เป็น ตัวหรี่ไฟ TRIAC แบบแผงหมุนที่มีช่องเอาต์พุตหนึ่งช่อง ออกแบบมาสำหรับการติดตั้งบนผนัง.
ตามคู่มือผลิตภัณฑ์ รองรับ:
- การปรับความสว่างแบบหมุน
- ปุ่มกดสำหรับเปิด/ปิด
- การตั้งค่าความสว่างขั้นต่ำ
- ฟังก์ชันหน่วยความจำ
คุณสมบัติเหล่านี้ทำให้ตัวหรี่ไฟใช้งานง่ายทั้งในพื้นที่ที่อยู่อาศัยและเชิงพาณิชย์.
การออกแบบหลักและความเข้ากันได้กับไดรเวอร์ LED
ตัวหรี่ไฟถูกสร้างขึ้นเพื่อควบคุม ไดรเวอร์ LED แบบหรี่แสงได้ด้วย TRIAC.
แทนที่จะควบคุมแรงดันไฟฟ้าโดยตรง มันจะปรับเปลี่ยนรูปคลื่น AC ที่เข้าสู่ไดรเวอร์ จากนั้นไดรเวอร์จะแปลงรูปคลื่นนั้นเป็นกระแส DC สำหรับหลอด LED.
เนื่องจากการทำงานร่วมกันนี้ ความเข้ากันได้ระหว่างตัวหรี่ไฟและไดรเวอร์จึงสำคัญมาก.
ข้อมูลจำเพาะทางไฟฟ้า
คู่มือระบุพารามิเตอร์ทางไฟฟ้าดังต่อไปนี้.
| พารามิเตอร์ | ข้อมูลจำเพาะ |
|---|---|
| แรงดันไฟฟ้าขาเข้า | AC200-240V |
| แรงดันไฟฟ้าขาออก | AC200-240V |
| กระแสสูงสุด | 1.25A |
| โหลดสูงสุด | 3-400W |
| วิธีการหรี่แสง | การตัดเฟสแบบหมุน (ขอบตาม) |
ข้อมูลจำเพาะเหล่านี้ช่วยให้ตัวหรี่ไฟสามารถควบคุมไดรเวอร์ LED ได้หลายประเภท.
ตัวหรี่ไฟยังรองรับ หลอด LED แบบหรี่ได้, ไดรเวอร์ LED แบบ TRIAC, หลอดไส้ และหลอดฮาโลเจน.
ข้อมูลจำเพาะด้านสิ่งแวดล้อมและความปลอดภัย
ตัวหรี่ไฟออกแบบมาสำหรับการติดตั้งภายในอาคาร.
| พารามิเตอร์ | ค่า |
|---|---|
| อุณหภูมิการทำงาน | −30°C ถึง +55°C |
| อุณหภูมิตัวเครื่อง | สูงสุด 85°C |
| ระดับการป้องกัน | IP20 |
| การรับรอง | CE, EMC, LVD |
มาตรฐานเหล่านี้รับประกันความปลอดภัยทางไฟฟ้าและความเข้ากันได้ทางแม่เหล็กไฟฟ้า.
คุณสมบัติอินเทอร์เฟซผู้ใช้และการควบคุม
แผงด้านหน้าประกอบด้วย ปุ่มหมุน ที่ทำหน้าที่สองอย่าง.
| การควบคุมการทำงาน | ฟังก์ชัน |
|---|---|
| กดปุ่ม | เปิด/ปิดไฟ |
| หมุนตามเข็มนาฬิกา | เพิ่มความสว่าง |
| หมุนทวนเข็มนาฬิกา | ลดความสว่าง |
อินเทอร์เฟซที่เรียบง่ายนี้ช่วยให้ผู้ใช้ควบคุมระดับแสงได้ง่าย.
หลักการทำงานของตัวหรี่ไฟ TRIAC รุ่น BQ-TTDIM
ผู้ใช้หลายคนรู้ว่าตัวหรี่ไฟเปลี่ยนความสว่างได้ แต่มีเพียงไม่กี่คนที่เข้าใจกระบวนการทางไฟฟ้าที่อยู่เบื้องหลังเอฟเฟกต์การหรี่ไฟ.
BQ-TTDIM ควบคุมความสว่างโดยการปรับมุมการนำไฟฟ้าของ TRIAC ในแต่ละรอบของกระแสสลับ มุมการนำไฟฟ้าที่ใหญ่ขึ้นจะส่งพลังงานไปยังไดรเวอร์ LED มากขึ้น ส่งผลให้ความสว่างสูงขึ้น.
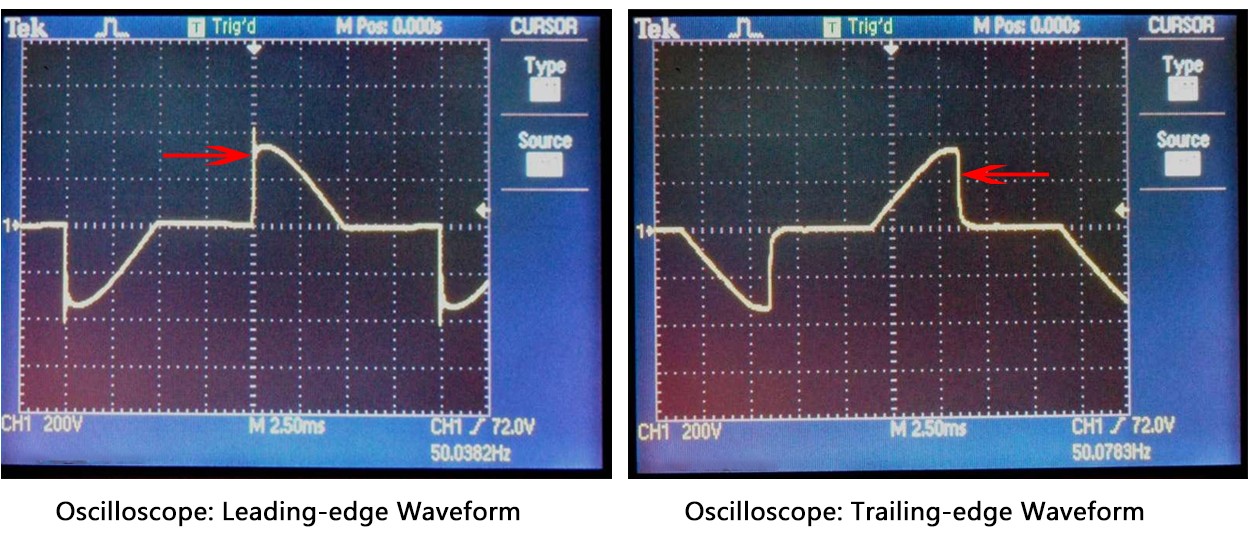
การตัดเฟสควบคุมกำลังไฟฟ้าอย่างไร
กระแสสลับเป็นรูปคลื่นไซน์.
ในตัวหรี่ไฟแบบ TRIAC:
- รูปคลื่นกระแสสลับเริ่มต้น.
- ตัวหรี่ไฟหน่วงสัญญาณทริกเกอร์.
- TRIAC เปิดที่มุมหนึ่ง.
- กระแสไหลในช่วงที่เหลือของครึ่งรอบ.
ยิ่ง TRIAC เปิดช้าลง พลังงานที่ไปถึงหลอดไฟก็ยิ่งน้อยลง.
บทบาทของสารกึ่งตัวนำ TRIAC
TRIAC ทำหน้าที่เป็นสวิตช์อิเล็กทรอนิกส์.
คุณสมบัติที่สำคัญ ได้แก่:
| คุณสมบัติ | คำอธิบาย |
|---|---|
| การนำไฟฟ้าสองทิศทาง | ทำงานกับกระแสสลับ |
| ถูกทริกเกอร์ด้วยสัญญาณเกต | เปิดที่แรงดันไฟฟ้าที่กำหนด |
| พฤติกรรมการล็อกสถานะ | ยังคงเปิดอยู่จนกว่ากระแสจะลดลงเป็นศูนย์ |
เนื่องจากไฟฟ้ากระแสสลับตัดผ่านศูนย์สองครั้งในทุกๆ รอบ TRIAC จึงรีเซ็ตโดยอัตโนมัติ.
การปรับมุมการนำไฟฟ้า
ปุ่มหมุนเปลี่ยนความต้านทานในวงจรจับเวลา.
สิ่งนี้เปลี่ยนความล่าช้าก่อนที่ TRIAC จะทำงาน.
ตัวอย่างระดับการหรี่แสง:
| มุมการนำไฟฟ้า | กำลังไฟฟ้าที่ส่งออก | ความสว่าง |
|---|---|---|
| 170° | สูง | สว่าง |
| 120° | ปานกลาง | ปานกลาง |
| 60° | ต่ำ | มืด |
วิธีนี้มีประสิทธิภาพเพราะตัวหรี่แสงไม่กระจายความร้อนจำนวนมาก.
ปฏิสัมพันธ์ระหว่างตัวหรี่แสงและไดรเวอร์ LED
เมื่อรูปคลื่นไปถึงไดรเวอร์ LED:
- ไดรเวอร์ได้รับแรงดันไฟฟ้ากระแสสลับที่ถูกตัด.
- ไดรเวอร์ตรวจจับมุมเฟส.
- อิเล็กทรอนิกส์ภายในปรับกระแส LED.
การออกแบบไดรเวอร์ที่ดีช่วยให้หรี่แสงได้ราบรื่นโดยไม่กะพริบ.
กระบวนการหรี่แสงทีละขั้นตอน
กระบวนการทั้งหมดทำงานดังนี้:
| ขั้นตอน | การกระทำ |
|---|---|
| 1 | ผู้ใช้หมุนปุ่มหรี่แสง |
| 2 | วงจรจับเวลาเปลี่ยนความล่าช้า |
| 3 | TRIAC ทำงานที่มุมเฟสใหม่ |
| 4 | ส่วนของรูปคลื่นกระแสสลับเปลี่ยนไป |
| 5 | ไดรเวอร์ LED ปรับกระแสเอาต์พุต |
| 6 | ความสว่างของ LED เปลี่ยนไป |
วงจรนี้ทำซ้ำทุกๆ รูปคลื่นกระแสสลับ.
การหรี่แสงแบบตัดขอบนำหน้าเทียบกับตัดขอบตามหลังในระบบ TRIAC
การหรี่แสงแบบตัดเฟสไม่ทั้งหมดทำงานเหมือนกัน ตัวหรี่แสงบางตัวตัดจุดเริ่มต้นของรูปคลื่น บางตัวตัดจุดสิ้นสุด.
การหรี่แสงแบบตัดขอบนำหน้าจะลบจุดเริ่มต้นของรูปคลื่นกระแสสลับ ในขณะที่การหรี่แสงแบบตัดขอบตามหลังจะลบจุดสิ้นสุด ตัวหรี่แสง TRIAC แบบดั้งเดิมใช้การตัดเฟสแบบขอบนำหน้า.
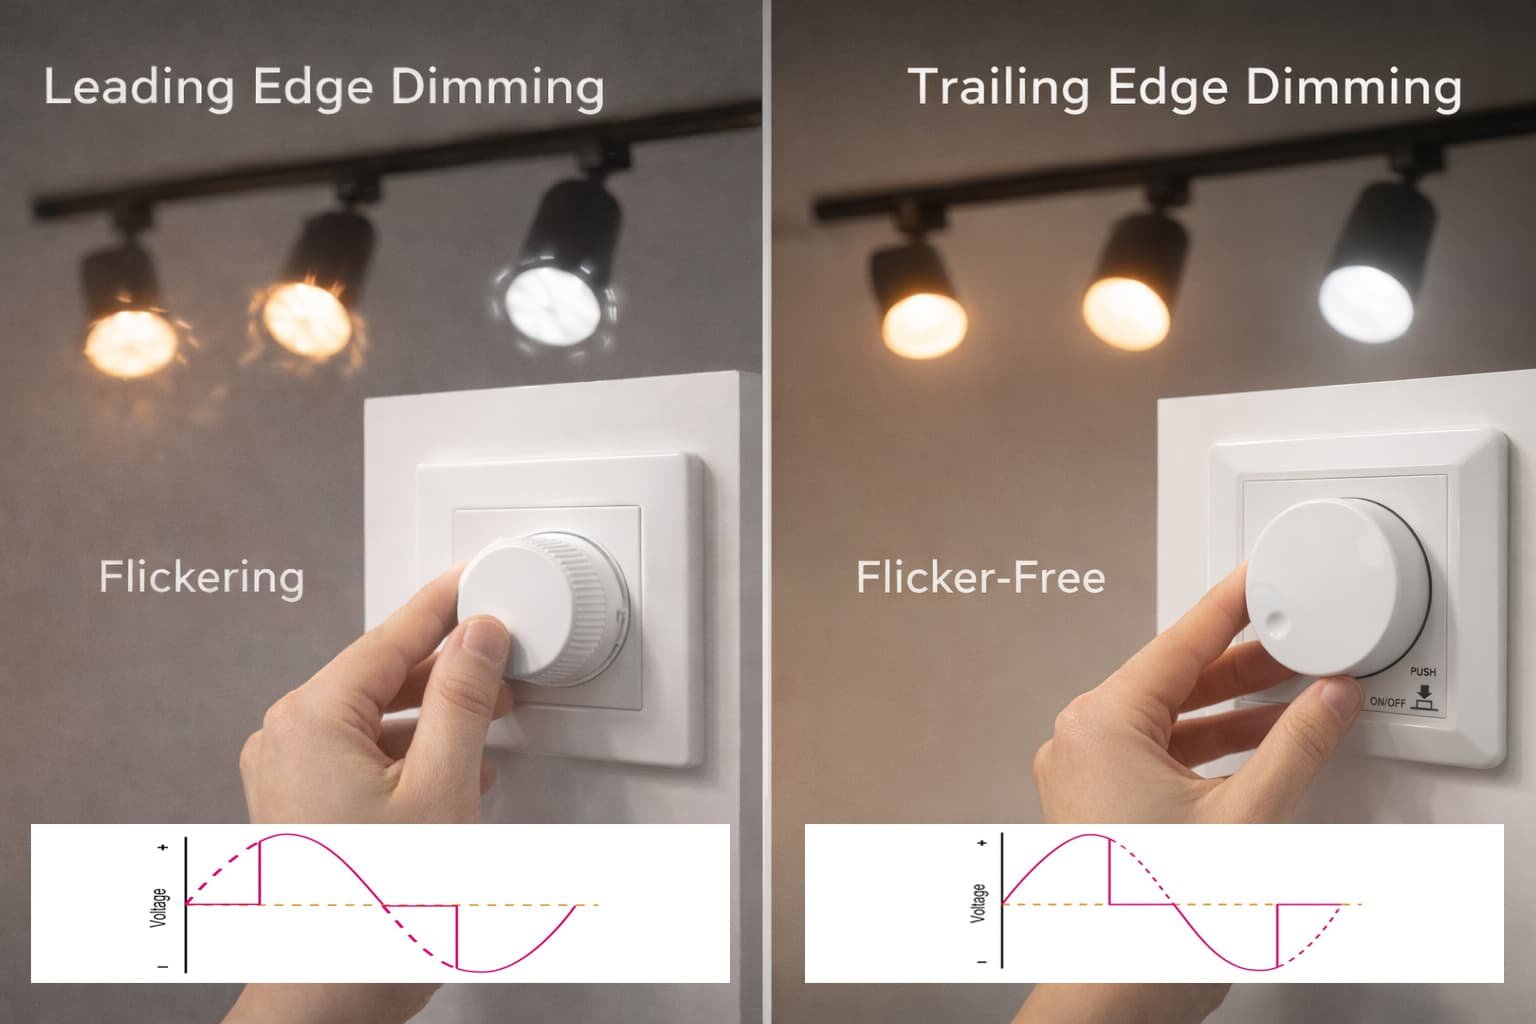
ความหมายของการหรี่แสงแบบตัดขอบนำหน้า
การหรี่แสงแบบตัดขอบนำหน้าจะหน่วงการเริ่มต้นของรูปคลื่น.
เมื่อถูกกระตุ้นแล้ว ส่วนที่เหลือของรูปคลื่นจะผ่านไป.
ลักษณะเฉพาะรวมถึง:
| คุณสมบัติ | คำอธิบาย |
|---|---|
| อุปกรณ์ควบคุม | ไตรแอก |
| การใช้งานทั่วไป | หลอดไส้ |
| ต้นทุน | ต่ำ |
| สัญญาณรบกวนทางไฟฟ้า | สูงกว่า |
การทำงานของการหรี่แสงแบบตัดขอบตามหลัง
การหรี่แสงแบบตัดขอบตามหลังใช้วิธีการที่แตกต่าง.
แทนที่จะหน่วงการเริ่มต้น มันจะตัดจุดสิ้นสุดของรูปคลื่น.
| คุณสมบัติ | คำอธิบาย |
|---|---|
| อุปกรณ์ควบคุม | มอสเฟต (MOSFET) |
| ระดับเสียงรบกวน | ต่ำกว่า |
| ความเข้ากันได้กับ LED | มักจะดีกว่า |
| ต้นทุน | สูงกว่า |
ประเภทใดที่ใช้ในตัวหรี่แสง TRIAC
ตัวหรี่แสง TRIAC ส่วนใหญ่ใช้ การหรี่ไฟแบบตัดขอบนำหน้า.
อย่างไรก็ตาม การออกแบบขั้นสูงบางแบบสามารถจำลองพฤติกรรมแบบตัดขอบตามหลังได้.
BQ-TTDIM ถูกอธิบายว่าเป็น ตัวหรี่แสงแบบตัดเฟสขอบตามหลังแบบหมุน ในคู่มือผลิตภัณฑ์.
สิ่งนี้ช่วยเพิ่มความเข้ากันได้กับไดรเวอร์ LED หลายตัว.
ข้อดีและข้อจำกัด
แต่ละวิธีการลดแสงมีจุดแข็งของตัวเอง.
| วิธี | ข้อดี | ข้อจำกัด |
|---|---|---|
| ขอบนำ | เรียบง่าย ต้นทุนต่ำ | EMI สูงขึ้น |
| ขอบตาม | การลดแสงที่นุ่มนวล | ต้นทุนสูงขึ้น |
ความเข้ากันได้กับไดรเวอร์ LED
ไดรเวอร์ LED ต้องรองรับวิธีการตัดเฟสแบบเดียวกัน.
มิฉะนั้นอาจเกิดปัญหา:
- การกะพริบ
- ช่วงการลดแสงที่จำกัด
- เสียงหึ่ง
การเลือกไดรเวอร์ที่เข้ากันได้ช่วยแก้ปัญหาส่วนใหญ่ได้.
ข้อดีหลักของการใช้ไดเมอร์ TRIAC BQ-TTDIM
ประสิทธิภาพการลดแสงที่ไม่ดีสามารถทำลายคุณภาพแสงได้ การกะพริบและความสว่างที่ไม่เสถียรเป็นปัญหาทั่วไป.
BQ-TTDIM ให้การลดแสงที่นุ่มนวล เข้ากันได้ดีกับไดรเวอร์แบบลดแสง TRIAC การติดตั้งง่าย และการทำงานที่เชื่อถือได้สำหรับการใช้งานแสงสว่างหลายประเภท.
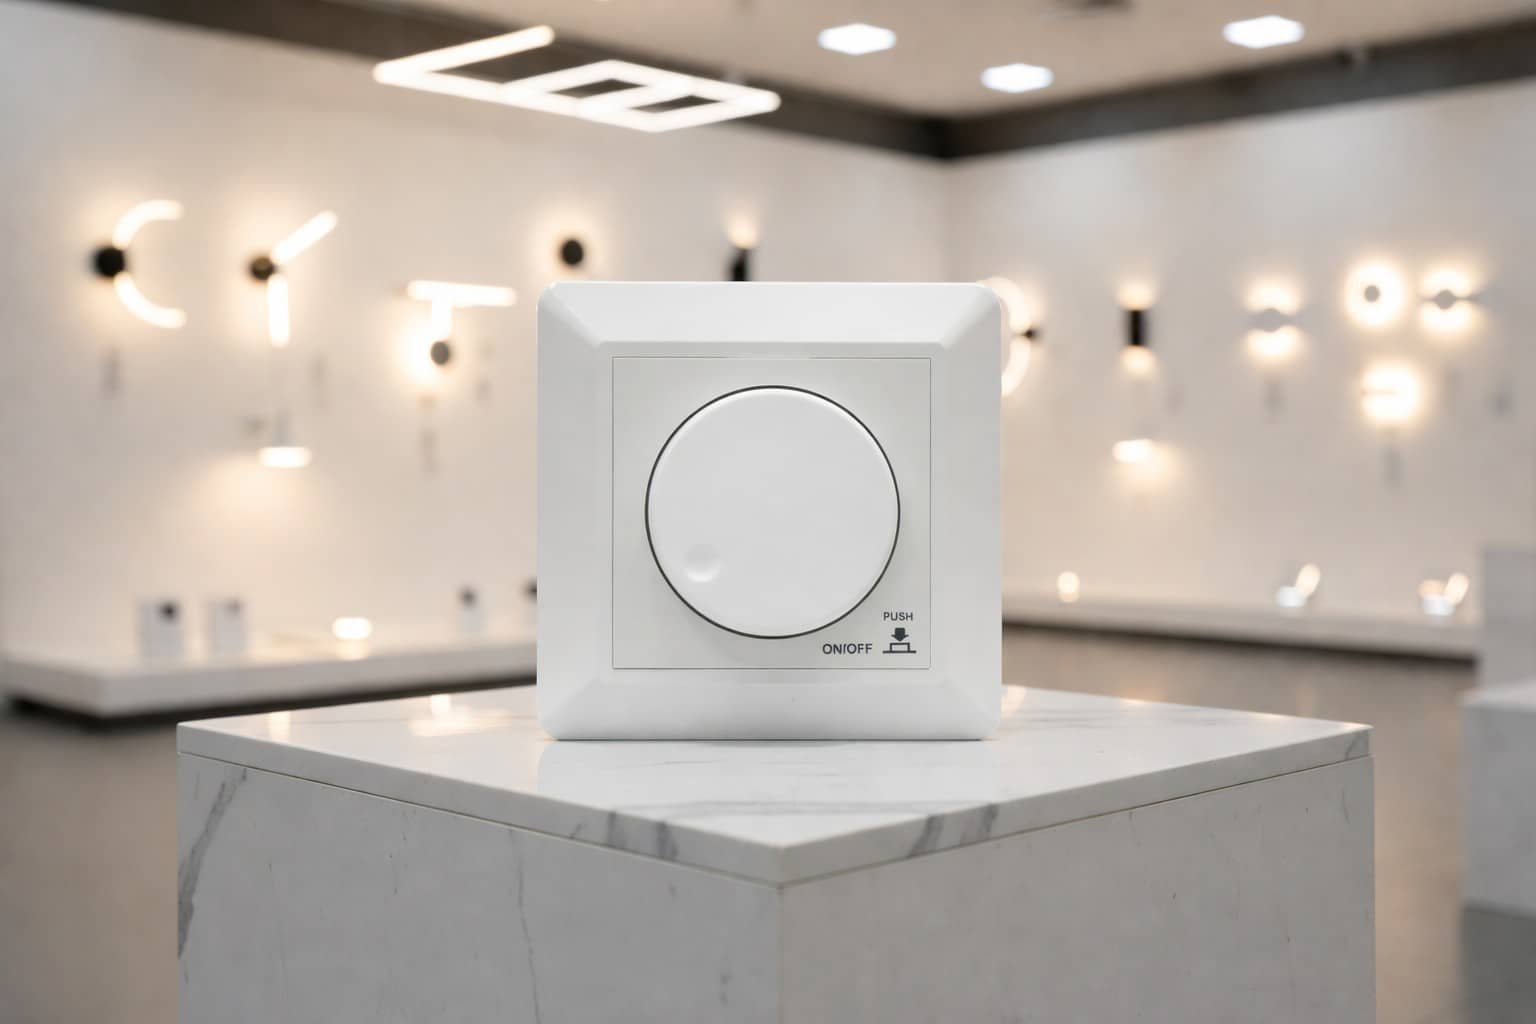
การลดแสงที่นุ่มนวลและเสถียร
ไดเมอร์ที่ดีให้การเปลี่ยนแปลงความสว่างอย่างค่อยเป็นค่อยไป.
BQ-TTDIM ช่วยให้ผู้ใช้ปรับความสว่างได้จาก 0-100% โดยใช้ปุ่มหมุน.
การลดแสงที่นุ่มนวลช่วยเพิ่มความสบายทางสายตาในสภาพแวดล้อมการอยู่อาศัยและการทำงาน.
ความเข้ากันได้สูงกับระบบ TRIAC ทั่วโลก
อาคารหลายแห่งใช้โครงสร้างพื้นฐานการลดแสง TRIAC อยู่แล้ว.
ข้อดีรวมถึง:
| ประโยชน์ | คำอธิบาย |
|---|---|
| การเดินสายมาตรฐาน | ไม่ต้องใช้บัสควบคุม |
| ความเข้ากันได้ทั่วโลก | ทำงานกับไดรเวอร์หลายตัว |
| เหมาะสำหรับการปรับปรุง | เปลี่ยนไดเมอร์เดิมได้ง่าย |
การติดตั้งง่าย
ไดเมอร์แบบติดผนังติดตั้งคล้ายกับสวิตช์มาตรฐาน.
ขั้นตอนการติดตั้งทั่วไปรวมถึง:
- เชื่อมต่ออินพุตไฟฟ้ากระแสสลับ.
- เชื่อมต่อเอาต์พุตกับไดรเวอร์ LED.
- ติดตั้งแผงไดเมอร์.
- ติดตั้งฝาครอบปุ่มหมุน.
เนื่องจากการเดินสายยังคงเรียบง่าย ช่างไฟฟ้าสามารถติดตั้งอุปกรณ์ได้อย่างรวดเร็ว.
การกะพริบที่ลดลง
เมื่อใช้กับไดรเวอร์ที่เข้ากันได้ ไดเมอร์จะให้การควบคุมความสว่างที่เสถียร.
การตรวจจับการตัดเฟสที่เหมาะสมในไดรเวอร์ LED ช่วยให้การลดแสงนุ่มนวล.
คุณสมบัติการป้องกัน
ไดเมอร์ยังรวมกลไกความปลอดภัย.
| การป้องกัน | ฟังก์ชัน |
|---|---|
| อุณหภูมิเกิน | ป้องกันความร้อนสูงเกินไป |
| โหลดเกิน | ปกป้องวงจรภายใน |
| การกู้คืนอัตโนมัติ | กลับสู่การทำงานปกติ |
การป้องกันเหล่านี้เพิ่มความน่าเชื่อถือของระบบ.
ความเข้ากันได้กับไดรเวอร์ LED แบบหรี่แสง TRIAC
หนึ่งในปัญหาที่ใหญ่ที่สุดในระบบไฟ LED คือความไม่เข้ากันระหว่างตัวหรี่แสงและไดรเวอร์.
ไดรเวอร์ LED ต้องถูกออกแบบมาเพื่อตรวจจับรูปคลื่นที่ถูกตัดเฟส หากไม่มีคุณสมบัตินี้ การหรี่แสงแบบ TRIAC จะไม่ทำงานอย่างถูกต้อง.

เหตุใดไดรเวอร์ต้องเข้ากันได้กับ TRIAC
ไดรเวอร์ LED แปลงไฟฟ้ากระแสสลับเป็นกระแสตรงที่ควบคุมได้.
การหรี่แสงแบบ TRIAC เปลี่ยนรูปคลื่นไฟฟ้ากระแสสลับ หากไดรเวอร์ไม่สามารถตีความรูปคลื่นนั้นได้ กระแส LED จะไม่เสถียร.
การออกแบบไดรเวอร์ส่งผลต่อการหรี่แสงอย่างไร
อิเล็กทรอนิกส์ของไดรเวอร์ต้องตรวจจับ:
- มุมการนำไฟฟ้า (Conduction Angle)
- รูปทรงของรูปคลื่น
- จุดตัดศูนย์
จากข้อมูลนี้ ไดรเวอร์จะปรับกระแส LED.
การจับคู่ไดรเวอร์กับประเภทตัวหรี่แสง
ไดรเวอร์สองประเภทที่พบได้ทั่วไปในระบบ LED.
| ประเภทไดรเวอร์ | การใช้งาน |
|---|---|
| กระแสคงที่ | โมดูล LED |
| แรงดันคงที่ | แถบ LED |
ทั้งสองประเภทสามารถรองรับการหรี่แสงแบบ TRIAC ได้หากออกแบบอย่างถูกต้อง.
การหลีกเลี่ยงปัญหาทั่วไป
ผู้ติดตั้งมักพบปัญหาต่างๆ เช่น:
| ปัญหา | สาเหตุ |
|---|---|
| การกะพริบ | ความไม่เข้ากันของไดรเวอร์ |
| การปรับแสงจำกัด | การออกแบบไดรเวอร์ที่ไม่ดี |
| เสียงรบกวน | สัญญาณรบกวนแม่เหล็กไฟฟ้าจากการตัดเฟส |
การเลือกส่วนประกอบที่เข้ากันได้ช่วยแก้ปัญหาเหล่านี้.
แนวทางปฏิบัติที่ดีที่สุด
สำหรับการหรี่แสงที่เสถียร:
- ใช้ไดรเวอร์ LED ที่เข้ากันได้กับ TRIAC.
- รักษาโหลดให้อยู่ในพิกัดของตัวหรี่แสง.
- ทดสอบช่วงการหรี่แสงระหว่างการติดตั้ง.
- หลีกเลี่ยงการผสมประเภทหลอดไฟที่เข้ากันไม่ได้.
การประยุกต์ใช้งานทั่วไปของตัวหรี่แสง TRIAC ในโครงการไฟส่องสว่าง
นักออกแบบแสงมักต้องการการควบคุมความสว่างที่ยืดหยุ่น โครงการอาคารหลายแห่งยังคงพึ่งพาระบบสายไฟแบบดั้งเดิม.
ตัวหรี่แสง TRIAC ถูกใช้อย่างแพร่หลายในบ้าน โรงแรม ร้านค้าปลีก และไฟสถาปัตยกรรม เนื่องจากทำงานกับสายไฟ AC มาตรฐานและต้องการโครงสร้างพื้นฐานการควบคุมน้อยที่สุด.

แสงสว่างที่อยู่อาศัย
บ้านได้รับประโยชน์อย่างมากจากการควบคุมการหรี่แสง.
ห้องทั่วไปประกอบด้วย:
| ห้อง | ประโยชน์ |
|---|---|
| ห้องนั่งเล่น | ปรับแสงตามอารมณ์ |
| ห้องนอน | แสงกลางคืนที่สบายตา |
| ครัว | แสงสำหรับทำงานที่ยืดหยุ่น |
ไฟสำหรับการต้อนรับ
โรงแรมและร้านอาหารพึ่งพาการหรี่แสงอย่างมาก.
ประโยชน์รวมถึง:
- การสร้างบรรยากาศ
- การปรับความสว่างสำหรับงานอีเวนต์
- การประหยัดพลังงาน
ขายปลีกแสงสว่าง
ร้านค้าปลีกใช้การหรี่แสงเพื่อเน้นสินค้า.
นักออกแบบแสงปรับความสว่างสำหรับ:
- ชั้นวางแสดงสินค้า
- หุ่นโชว์เสื้อผ้า
- ไฟตกแต่ง
แสงสว่างทางสถาปัตยกรรม
โครงการสถาปัตยกรรมมักต้องการความเข้มของแสงที่ปรับเปลี่ยนได้.
ตัวปรับแสงช่วยให้:
- ควบคุมไฟด้านหน้าอาคาร
- ไฟเน้นจุดเด่น
- ปรับบรรยากาศโดยรอบ
โครงการเปลี่ยนหลอดไฟเป็น LED
อาคารเก่าหลายแห่งยังมีการเดินสายไฟแบบดั้งเดิม.
ตัวปรับแสง TRIAC ช่วยให้การอัปเกรด LED ง่ายขึ้นเพราะ:
| ข้อได้เปรียบ | คำอธิบาย |
|---|---|
| ไม่ต้องใช้สายควบคุมใหม่ | ใช้สายไฟเดิมที่มีอยู่ |
| ต้นทุนการติดตั้งต่ำ | การเปลี่ยนแปลงน้อยที่สุด |
| อัปเกรดได้รวดเร็ว | เปลี่ยนหลอดและไดรเวอร์ |
ด้วยเหตุนี้ ตัวปรับแสง TRIAC จึงยังคงได้รับความนิยมอย่างมากในตลาดการเปลี่ยนอุปกรณ์.
เคล็ดลับการติดตั้งเพื่อประสิทธิภาพการปรับแสง TRIAC ที่เสถียร
แม้ตัวปรับแสงที่ดีก็อาจทำงานได้ไม่ดีหากติดตั้งไม่ถูกต้อง ปัญหาการปรับแสงหลายอย่างมาจากการเดินสายหรือโหลด.
การเดินสายที่ถูกต้อง การจับคู่โหลดที่เหมาะสม และการทดสอบความเข้ากันได้เป็นสิ่งจำเป็นเพื่อให้ได้ประสิทธิภาพการปรับแสง TRIAC ที่เสถียร.

การกำหนดค่าการเดินสายที่ถูกต้อง
BQ-TTDIM เชื่อมต่อระหว่างไฟหลัก AC และไดรเวอร์ LED.
ตามแผนภาพการเดินสายในคู่มือ ตัวปรับแสงจะรับ อินพุตไฟ AC และส่งสัญญาณ AC แบบตัดเฟสไปยังไดรเวอร์ LED แบบ TRIAC.
ตรวจสอบให้แน่ใจเสมอว่าการเชื่อมต่อแน่นหนาก่อนเปิดระบบ.
การคำนวณโหลด
ตัวปรับแสงรองรับได้สูงสุด โหลด 400W ที่ 220V.
อย่างไรก็ตาม ไดรเวอร์ LED มีกระแสไฟกระชาก.
คู่มือระบุว่า กระแสไฟกระชากทั้งหมดต้องไม่เกินสองเท่าของขีดจำกัด 65A.
ข้อพิจารณาเกี่ยวกับโหลดขั้นต่ำ
ตัวปรับแสงบางรุ่นต้องมีโหลดขั้นต่ำเพื่อทำงานอย่างถูกต้อง.
สำหรับระบบ LED:
- หลีกเลี่ยงโหลดที่เล็กมากเกินไป
- ตรวจสอบความเข้ากันได้ของไดรเวอร์
การทดสอบช่วงการปรับแสง
หลังการติดตั้ง ให้ทดสอบระดับความสว่าง.
ตรวจสอบ:
- การกะพริบ
- จุดที่ไม่มีสัญญาณ
- การกระโดดของความสว่างอย่างกะทันหัน
หากพบปัญหา ให้ทดสอบไดรเวอร์อื่น.
การแก้ไขปัญหาทั่วไป
คู่มือระบุขั้นตอนการแก้ไขปัญหาง่ายๆ.
| ปัญหา | สาเหตุ | แนวทางแก้ไข |
|---|---|---|
| ไม่มีแสง | ไม่มีไฟ | ตรวจสอบแหล่งจ่าย AC |
| ไม่มีแสง | การเดินสายผิด | ตรวจสอบการเชื่อมต่อ |
การเดินสายที่ถูกต้องมักจะแก้ปัญหาการติดตั้งส่วนใหญ่ได้.
บทสรุป
ตัวปรับแสง TRIAC BQ-TTDIM ควบคุมความสว่างโดยปรับการนำไฟฟ้าของเฟส AC ผ่านสวิตช์ TRIAC ทำให้สามารถปรับแสงได้อย่างนุ่มนวลสำหรับไดรเวอร์ LED ที่เข้ากันได้ หลอดไส้ และระบบไฟฮาโลเจน.